ACCELERATED MOVEMENTS

Alessandro M.
Hi,
Now that you have learned to program the exit conditions from loops, we can use them to program some controlled movements.
In this lesson, you will learn to create a sequence of instructions to achieve accelerated movement.
To ensure that the Robot's wheels do not slip during movement, we should move very slowly.
At the same time, moving quickly allows us to save precious time to complete a greater number of missions within the time limit.
Thanks to accelerated movements, we can start slowly to avoid wheel slippage and at the same time move quickly across the field in long stretches.
Introduction
The idea is to create a program that gradually adjusts the movement speed.
For example, let's assume the goal is to move at 80% speed. Directly inputting the value 80 risks wheel slippage.
For this reason, we will create a variable that contains the actual speed value and will be gradually incremented during the path until it reaches the desired 80.
In this way, even if we do not directly input the value 80, the robot will slowly reach it, making the movement smoother and more precise.
Creating the Movement
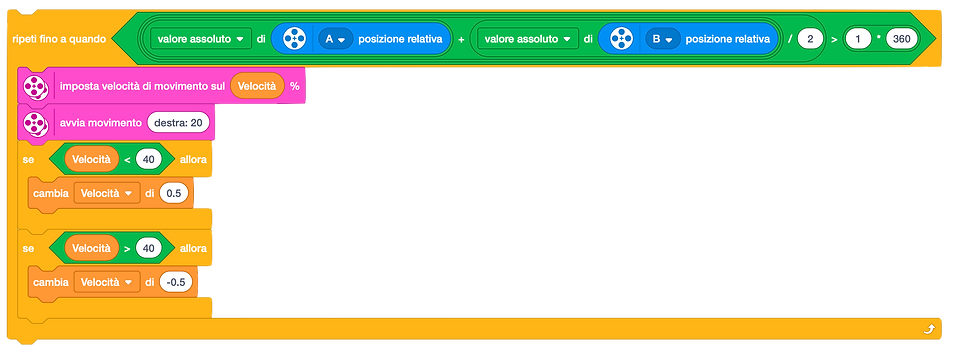
First, let's start from the rotation exit condition we created in the previous lesson by adding the block that allows us to adjust the movement speed. We then create a variable called Speed in which we will store the actual speed at which the robot should move.


All'interno del nostro ripeti dobbiamo inserire una condizione che ci permette di modificare il valore della velocità effettiva quando questo è diverso a quello che volgiamo raggiungere.
Per farlo creiamo una condizione Se Velocità minore di 80 ed inseriamo al suo interno il blocco Cambia Velocità di 1.
Allo stesso modo inseriamo la condizione Se velocità maggiore di 80 ed inseriamo al sui interno il blocco Cambia Velocità di -1.
Il valore 1 è l'accelerazione che vogliamo impartire al nostro Robot, con numeri più piccoli otteniamo movimenti più dolci.
La prima condizione serve per accelerare mentre la seconda serve per frenare ed entra in azione quando il robot si sta già muovendo a velocità maggiore rispetto a quella che vogliamo raggiungere.
Come ultima cosa dobbiamo ricordarci di portare a zero il valore della velocità tutte le volte che arrestiamo il movimento. Se ci dimentichiamo di farlo il robot ripartirà utilizzando l'ultimo valore che ha salvato in memoria che potrebbe essere eccessivamente alto.

Example of accelerated motion
In the figure, a sequence of two movements is shown, followed by a stop instruction with a speed reset.


Creating the Custom Block
Accelerated motion instructions are essential to ensure greater reliability during robotic performance, however writing so many instructions for each single movement can be tiring.
For this reason, it is a good idea to create a Custom Block that allows us to perform accelerated movements whenever we want.
As we did in the previous lesson, we define the block by inserting the parameters Rotations , Trajectory and Speed .
Let's hook our code into the define block and replace the parameters. You should get the program shown below.
One trick we can use is to create an acceleration variable that allows us to modify the fluidity of our movements when we use accelerated movement in different contexts.


To avoid forgetting to reset the speed to zero every time we stop the movement, we can create a custom stop block that does this automatically.


Conclusions
Accelerated movements are essential to ensure good reliability of the robot. By combining this code with other controlled movements like Gyro Steering, you will achieve smooth and precise movements to participate in the competition.
In the next lesson, we will focus on controlled movements using the gyroscope.
See you next time!